Wednesday, December 24, 2008
Sunday, December 21, 2008
Last Minute Gift Giving for your Doll Making Friend?
If you have a doll making friend that you need to buy for...let them choose their own gift by giving them a Doll Artist's Workshop/minidolls.com Gift Certificate. They will be delivered within hours right to their e-mail inbox. So no need to paying shipping or rush to the mall!!


Tuesday, December 16, 2008
So Ashamed...
 I have been so busy with holiday stuff and preparing for family coming in this week. Terrible stuff like washing rugs and cleaning carpets. Good stuff like making my x-mas card and going up in the mountains to find our x-mas tree. But don't worry to much as Kathi and I are working on things behind the scenes. "New Arrivals" for the New Year. Really not to be missed exciting stuff!
In the mean time....Enjoy this precious pictures.

Wednesday, November 26, 2008
The Day We Give Thanks!!
 I cannot believe that it has been so long since I posted. I am shamed...But, the kids got sick and so loving gave it to me...I am as sick as a dog. The good news is we are going OUT FOR DINNER for thanksgiving so I won't be exhausted cooking. The bad news is no left overs and no extended family visiting. Just our family of 5! Shocking still so say that out loud. Zach's 4rth Birthday is the 27th too so we will have a busy festive day. I hope everyone has a joyful, safe and thankful Thanksgiving!!
Michelle minidolls.com and Kathi minipatterns.com


Thursday, November 13, 2008
Tutorial - Make Your Own Tassels
 Step One
Gather your tools. Judee’s TasselMaker©, floss, scissors and some tape. If you have an old, clean toothbrush for fraying the tassel edges, use it. Not pictured, but a tool I like to use is a dental cleaner. (It has a handle with the “Christmas Tree” brush on the end of it.) Floss of your choosing.
 Step Two
The tool comes with pins set for your first set of tassels. In this demonstration, I make large tassels so you can see them. When using the tool for most of my miniature projects, I make multiple tassels tying off the tops and the bottoms.

Pull a 6-strand length of floss from your skein. Tie a knot in one end and separate the strands. (You might notice I am working on a pinning board. My board is made of ceiling tile or foam core and covered with gingham.)
 Step Four
Per the instructions provided with your tool, place the separated strands over the pin to create some tension. Begin passing the 6 strands over and under the pins in a serpentine manner. Keep good tension, but it does not have to be “tight".
 Step Five
Continue to the end of the pins.
 Step Six
When you reach the last pin, wrap around the pin and follow the course back to starting point and the original knotted end.
 Step Seven
Securely tape the remaining floss to hold the tension.
 Step Eight
Thread a needle with one strand of floss and tie a knot.
 Step Nine
Place the knot over the pin as you did with the original knot, proceed up to the first pin and tie a surgeons knot(*see below) over the floss. This will join two sides of each loop.
 Step Ten
Wind the floss under the bottom pin and back to the top. Bring the thread around the pin and tie another surgeon’s knot. Continue in this manner until all of the knots are completed. (You can tie knots on the lower pins as well, depending on the size and number of tassels you require.)
 Step Eleven
Place a dot of glue on each knot to secure it.
 Step Twelve
Steam the floss and let it cool.
 Step Thirteen
Remove the bottom pins. (If you are making lower tassels and upper tassels, leave the pins and go to step 14.)
 Step Fourteen
Cut away the bottom edge of the tassels longer than your desired finished size.
 Step Fifteen
Comb (a lot) the threads until they begin to fray. Keep combing until they shine and are satiny.
 Tutorial by: Kathi of minipatterns.com
The Tasselmaker can be find at Doll Artist's Workshop minidolls.com: Tasselmaker
Instead of Embroidery floss why not try silk thread? Once unraveled its natural twist makes fabulous tassels: Silk Thread
Here is a picture of a doll I made using the silk thread. The tassels are on her boots.
Michelle minidolls.com

* Surgeons Knot

Thursday, November 6, 2008
Rising to the Challenge
 Recently a revered woman in the doll world and more recently in the miniature world passed away. The loss of Doreen Sinnett makes us sad. Fortunately for us doll makers her business continues in the capable hands of her daughter, Drena West. http://www.doreensinnettdolls.com/
 Doreen created many doll kits for those who liked dressing dolls. (There are molds for those who like to do the whole process.) A client that thought my style of dressing a doll would be great for her Doreen Sinnett porcelain sent one such kit to me. What a compliment. Her instructions to me were quite specific, “Surprise me!”That I knew of the client was she liked pastels, closest to white the better, feminine but not fussy, lace and antiques. I tried to pin her down to a period or a style, even asked her where it would be placed in her home. Nothing. By now, I am crying fowl. The answer was always similar, “I have faith in you, you will know what to do, I trust you, surprise me.” It was time to rise to the challenge and dress a doll that would make Doreen proud and my client very happy. Doreen had dressed her hair in a high style reminiscent of Marie Antoinette, yet still appropriate for a mid Victorian ball gown. I hit the reference books with my list of requirements. There were two periods I felt would work with the hairstyle already on the doll. I landed on a ball dress from a design plate from Harper’s Bazaar 1877. I had the dress! Then the painful, yes painful, decision about fabrics. (Usually that s the fun part, but it had to be great.) The doll had tiny dots of fuchsia flowers in her hair and knowing the desire for femininity, I went with pink, a light, almost dusty rose. After deciding on the main color, choosing the other colors was easy. When I am unsure, I use a color wheel.
Finally, bringing the dress to reality was another matter. Many times, I had to make different parts of the gown. My client and I are so pleased with the result. With her permission, I am sharing this figure with you today. I hope you enjoy seeing her. She is 5 ½” tall. Doreen had dressed her hair in a high style reminiscent of Marie Antoinette, yet still appropriate for a mid Victorian ball gown. I hit the reference books with my list of requirements. There were two periods I felt would work with the hairstyle already on the doll. I landed on a ball dress from a design plate from Harper’s Bazaar 1877. I had the dress! Then the painful, yes painful, decision about fabrics. (Usually that s the fun part, but it had to be great.) The doll had tiny dots of fuchsia flowers in her hair and knowing the desire for femininity, I went with pink, a light, almost dusty rose. After deciding on the main color, choosing the other colors was easy. When I am unsure, I use a color wheel.
Kathi minipatterns .com

Friday, October 31, 2008


Friday, October 24, 2008
Mid to Late Victorian Fashions - 1860 - 1901
 After 1860 there were 3 big changes in Fashion: The invention of the sewing machine, Synthetic dyes would allow more intense colors and that the crinolines shirt flattened in the front and moved and softer towards the back. Charles Worth thought the crinoline skirt unattractive. He is associated with a manipulation of this style resulting the shape soon changed to a new trained, softer bustled version, which only the really rich found practical.
1870s fashion in European and European-influenced clothing is characterized by a gradual return to a narrow silhouette after the full-skirted fashions of the 1850s and 1860s.
By 1870, fullness in the skirt had moved to the rear, where elaborate draping was held in place by tapes and supported by a bustle. This fashion required an underskirt, which was heavily trimmed with pleats, rouching, and frills. This fashion was short-lived (though the bustle would return again in the mid-1880s), and was succeeded by a tight-fitting silhouette with fullness as low as the knees: the cuirass bodice, a form-fitting, long-waisted, boned bodice that reached below the hips, and the princess sheath dress.

Daytime dresses had high necklines that were either closed, squared, or V-shaped. Sleeves of day dresses were narrow throughout the period, with a tendency to flare slightly at the wrist early on. Women often draped overskirts to produce an apronlike effect from the front.
Evening dresses had low necklines and very short, off-the-shoulder sleeves, and were worn with short (later mid-length) gloves. Other characteristic fashions included a velvet ribbon tied high around the neck and trailing behind for evening (the origin of the modern choker necklace).
1880- As in the previous decade, emphasis remained on the back of the skirt, with fullness gradually rising from behind the knees to just below the waist. The fullness over the buttocks was balanced by a fuller, lower bosom, achieved by rigid corseting, creating an S-shaped silhouette.
Skirts were looped, draped, or tied up in various ways, and worn over matching or contrasting underskirts. The polonaise was a revival style based on a fashion of the 1780s, with a fitted, cutaway overdress caught up and draped over an underskirt. Long, jacket-like fitted bodices called basques were also popular for daywe
 ar.
ar.Evening gowns were sleeveless and low-necked (except for matrons), and were worn with long over the elbow or shoulder length gloves of fine kid leather or suede.
Choker necklaces and jeweled collars were fashionable under the influence of Alexandra, Princess of Wales, who wore this fashion to disguise a scar on her neck.
Fashionable women's clothing styles shed some of the extravagances of previous decades (so that skirts were ne
 ither crinolined as in the 1850s, nor protrudingly bustled in back as in the late 1860s and mid-1880s, nor tight as in the late 1870s), but corseting continued unmitigated, or even slightly increased in severity. Early 1890s dresses consisted of a tight bodice with the skirt gathered at the waist and falling more naturally over the hips and undergarments than in previous years.
The mid 1890s introduced leg o'mutton sleeves, which grew in size each year until they disappeared in about 1896. During the same period of the mid '90s, skirts took on an A-line silhouette that was almost bell-like. The late 1890s returned to the tighter sleeves often with small puffs or ruffles capping the shoulder but fitted to the wrist. Skirts took on a trumpet shape, fitting more closely over the hip and flaring just above the knee. Corsets in the 1890s helped define the hourglass figure as immortalized by artist Charles Dana Gibson. In the very late 1890s the corset elongated, giving the women a slight S-curve silhouette that would be popular well into the Edwardian era.

Saturday, October 18, 2008
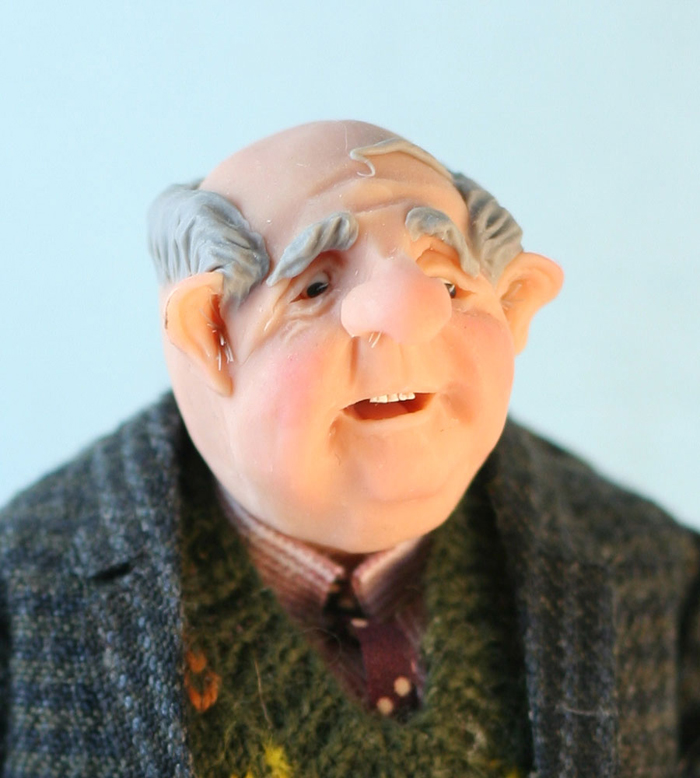
Show and Tell - Old English Man
On one of my trips to England to attend Miniatura in Birmingham, I purchased this old man. I love him as he reminds me so much of England. His garb is so typical of gentleman of his age. Notice that the artist even made teeny tiny femo nose and ear hair. The doll is made by Carol Bull of Bags of Characters. Michelle minidolls.com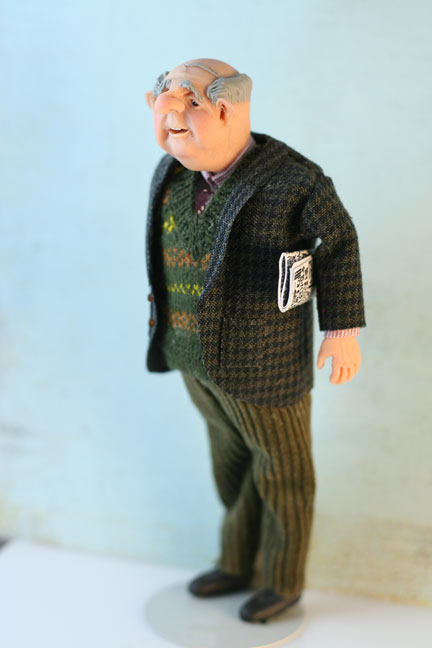
Friday, October 17, 2008
New to minidolls.com/Doll Artsit's Workshop
Click on the titles to see the items on my website. Michelle minidolls.com/Doll Artist's Workshop
Insect Pins
These pins are used by entomologists. They are the sharpest finest pin I have ever seen. Choose from black enameled or stainless. Both have a gold nylon head. Gold Tipped Stamin
Gold tipped Stamins use to decorate your miniature millinery.

Hat made using the Stamins.
More new Silk Hair colors:
 Black/Dk Brown
 Lt Brown
 Dk Blonde
Insect Pins
These pins are used by entomologists. They are the sharpest finest pin I have ever seen. Choose from black enameled or stainless. Both have a gold nylon head.
 Gold Tipped Stamin
Gold tipped Stamins use to decorate your miniature millinery.

Hat made using the Stamins.

More new Silk Hair colors:
 Black/Dk Brown
 Lt Brown
 Dk Blonde
Tuesday, October 14, 2008
Ruche Ribbon How To
Here is a quickie how-to make ruched ribbon. Have fun!! Kathi and Michelle
 Step 1
Tie a knot in the end of the ribbon you want to ruche and pin to your work board. Step 2
Snip a line about 1/8” into the center of the ribbon to separate the threads. Step 3
Separate the threads to find the outside threads. Step 4
Using a bit of tension begin to push the ribbon toward the pinned knot. Work this slowly. Use the tension to keep it from rolling and getting out of your control. Step 5
Using a bit of tension begin to push the ribbon toward the pinned knot. Work this slowly. Use the tension to keep it from rolling and getting out of your control.
 Step 6
Continue ruching to the required length. I dot glue along the knot edge and the finished edged before cutting any of the strings away.
 Step 1
Tie a knot in the end of the ribbon you want to ruche and pin to your work board.
 Step 2
Snip a line about 1/8” into the center of the ribbon to separate the threads.
 Step 3
Separate the threads to find the outside threads.
 Step 4
Using a bit of tension begin to push the ribbon toward the pinned knot. Work this slowly. Use the tension to keep it from rolling and getting out of your control.
 Step 5
Using a bit of tension begin to push the ribbon toward the pinned knot. Work this slowly. Use the tension to keep it from rolling and getting out of your control.
 Step 6
Continue ruching to the required length. I dot glue along the knot edge and the finished edged before cutting any of the strings away.

Subscribe to:
Posts (Atom)